~ Welcome ~
Welcome to my blog! Here I'll be occasionally showcasing some of my work and letting you know when & where I'll be at craft fairs. I hope to see you there!
Wow! It sure has been awhile since I blogged! Yikes! I didn't even realize I had a draft from almost a year ago! I don't know why it's still as a draft since it was scheduled to post, but I guess blogger had something else planned lol. Anyways...here's my long ago post...
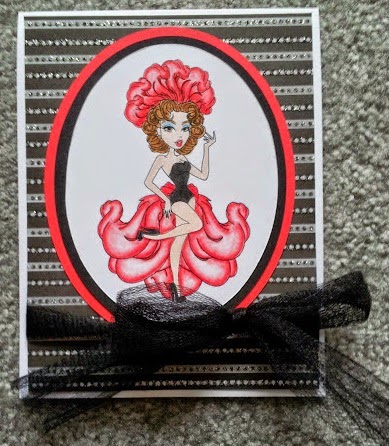
Hi All! This last challenge was to use your favorite color combo...and lately I've been loving the black/red combo, so that's what I went with. The picture didn't come out great, but the background paper is from a sparkle pack, and there are some sparkles in it, you just can't tell from the picture. The bow is from a tulle-type material I had, but it made me think of fishnet stockings so I used it for this card. I colored her with Prismacolor colored pencils and cut her and the mats using my Creative Memories cutting set - she was too large to use my nesties with.
I was so excited about doing the background to this card that I forgot one of the elements of the challenge - using hearts. OOPS! Anyways... here's my card... The image is Pinup Kitty and I colored her with Prismacolor colored pencils. My hubby's birthday is Feb. 12, so I thought going with red would work for him :-) I wrote the sentiment out by hand and fussy cut it. She was die cut using Nestabilities and a Cuttlebug machine. For the background...are you ready for this?.... I had saved awhile back the plastic mesh-type thing that is on the top part of a box of clementines. I thought it might make a good stencil someday...and this was the perfect card for it! I used Stampin' Up's Stampin' Pastels chalks and rubbed it all over the 'stencil' over black paper. I love how it came out! AND even my hubby picked up on it and commented on how much he liked the background - not a typical thing for him to do lol
Happy New Year! Kids are finally back to school after an extended holiday break (due to snow - yippee!) and it's time to get back into the swing of things. Today I've got my latest submission for the monthly challenge over at Sassy Studios Designs (it's on their FB page). This month's challenge was fancy folds using Katniss, Girl On Fire! She was so fun to color I colored two! But I'm only showing one creation for the challenge. I wasn't really sure what I was going to make with her, but my daughter saw the first one I had colored and mentioned how she'd like her in purple, so I made this for her (shhhh...she doesn't know lol) This was my first attempt at doing a side step card but I like how it came out. I think I'll be making more of these in the future. The image was colored with Prismacolor colored pencils and fussy cut. The shimmery mats are actually backs of business cards. I don't remember where I got them, but someone gave them to me and I saved them for crafting. I die cut the scalloped oval one using Nestabilities and the corner punch is from EK Success (Cardcreator - Interlaced Corner Punch). Katniss is popped up with pop dots. Underneath her is embossed using Cuttlebug's Organic Flourish border folder. It's hard to see, but the ruffle in her dress is pink, so I folded a ribbon for the middle step. The last step's mat was corner punched with Fiskars Multiple Circles. The sentiment was heat embossed in white and die cut with scalloped circle nesties.
Thanks for looking!
Hi All! Here's my latest monthly challenge over at Sassy Studio Designs. The challenge was to use Santa Pin-Up to create a white on white project and you can't use the traditional Christmas colors - red, green, gold or silver. I think the white on white part was hardest for me! In any event... the digi was colored with Prismacolor colored pencils. I chalked around the edges of all the die cuts/punches with Lavender Lace ink from SU. I embossed the background and punched some snowflakes (I layered a small one on top of a larger one), added a tag and ribbon and there you have it! Boy, that sounds so simple but in reality it took me forever! LOL I hope you like it!
I can't believe I'm saying this...but I've (finally) entered a progressive challenge...for the first time ever! (Well, this is my second project technically, but since I've actually continued to the next month I'm going to count this as beginning) :-) In any event...the task at hand was to create a fall themed project using Sassy Studio Designs Scarecrow Sassy. Isn't she cute?! She was fun to color with all the fall colors. She was colored using Prismacolor colored pencils. The sentiment was computer generated by moi! Enjoy!
NO...not my prom...mine was too long ago! LOL A friend of mine decided to have a prom for her 30th birthday party. Everyone's dressing as if they are going to a prom! Sassy Studio Designs has the perfect digi for this! She's called Ashelee's Prom (I know, fitting, right?!) Since my friend's favorite color is purple, that's what a chose for Ashelee's dress. I colored her with Prismascolor pencils and added glitter glue on her hair tie, sash and of course her shoes! A girl needs sparkly shoes for her prom! I also had some shiny silver sticky paper (I think it's actually used for something electrical) that I cut with my Cuttlebug as a double mat. I thought it would give it a disco ball kind of feel (not that the picture shows it that well, but it was quite shiny!) I added 30's all over the background and some gemstones around the corners and Voila!
(Sorry the pics aren't that great - the colors are more vibrant than what these show, but with the shiny paper it was hard to get a decent shot.)
 |
| Close-up - check out the glitter :-) |
 |
| Trying to show the shininess of the silver paper |



 Posts
Posts